


 Technology (Tutorials, Opinions, & More) Technology (Tutorials, Opinions, & More)
 Technology Repair Log Technology Repair Log
How to make a website
This tutorial is very long because I like to be as detailed as possible, while anticipating any questions you may have, and answering those questions in the process. I pride myself on trying to be a valuable teacher, as I put myself in the "student's seat" as I write tutorials. With that mindset, I explain brand new, convoluted topics to the student in a way that is basic and easily digestiable, while informative.
I don't write the above to give myself a pat on the shoulder. I write it to assure you that this long tutorial is not difficult nor something to be intimidated by. There are plenty of tutorials on the internet that explain this very topic with much more brievity, but, you may not understand nor learn as much.

Overview:
There are a few different ways to create a website. Here is a list, with the pros and cons of each method:
1. Get a website from a company like SquareSpace.
Pros: Quick and so easy that a person with down syndrome and skid marks could do it.
Cons: Lack of free speech, definite censorship, beholden to Squarespace's whim, no learning of what it takes in the backend to create a website.
2. Get your own server and install Wordpress with a one-click install
Pros: Quick and easy. Ability to choose a server who is respectful of creative speech.
Cons: No understanding of the tools in the backend which create a website. Meaning, if anything were to go wrong or you wanted to tweak server files, you wouldn't have the know-how, plus, one-click-install businesses tend to disable the ability to alter anything on the server (with root), because they don't trust you to not screw up your server.
 3. Get your own server, manually install and manage everything required by utilizing the command line 3. Get your own server, manually install and manage everything required by utilizing the command line
Pros: Ability to choose a server who is respectful of creative speech. Full understanding of administering a server, understanding the functionality of websites, how they are served up to the internet, how domains connect to websites, how SSL certificates work, how to SSH into a server, how to use commands in the command line, how to use vim. If these words are totally foreign to you right now, that is ok. I will explain all of these words in detail in the tutorial. For now, it's important to understand that by choosing my method, you are getting a class in understanding how to administer a server WHILE creating a website, which is very valuable.
Cons: Slightly more time consuming compareatively and initially, but the investment is very well worth it.
In my time with messing with servers, linux, or anything digital, I have learned that understanding the underlying infrastructure is massively important. It puts many tools in your toolbelt that you can utilize in the future. Whereas if you had done things the "easy" way, you may have a website, but you may never know how to troubleshoot it like an expert. (While I am not an expert, I certainly know more than someone who made a Squarespace website). In creating a website alone, you have also become a system administrator capable of using the command line, this is an achievement you should feel great about. These are skills that can lead you to many more intersting hobbies. Think of this as a gateway drug, except you overdose on fun with more opportunities to learn other digital skills.
If you have trouble while following this article, you can email me. ashleyjones@icum.to I will assist as much as I can, but I ask that you describe the issue as best as you can. This will better equipt me to be able to help you.
Step 1. Write html files locally
To start building a website, you need to create to actual webpages. You can create webpages that are saved on your computer, and then view these webpages in your browser.
The webpages won't actually be online for others to view, as these are simply files saved only on your computer. This is actually a benefit right now. You will want to create your website privately before making it live. This allows you to get your hands dirty with creating a website without facing the committment of messing with servers and domains right away (if those words are intimidating right now, we will discuss them later).
Later, when you are satisfied with your webpage, we will move onto the next steps of making your webpage(s) live. For now, we will focus on the fun part -- making the actual webpage.
This tutorial will inform you as to how to make a basic webpage. A basic webpage utilizes something called HTML and CSS. HTML is a "markup language", it is not coding nor programming. HTML is written text in a document, but, when you view this file in a browser, you will see the webpage you created BASED ON the text you had written in the HTML file. This is done by utilizing "tags" in your HTML document.
I do not want you to follow along with an actual HTML document yet. Simply read what I have wrote to understand this basic concept first.
HTML is written text in a document, but, when you view this file in a browser, you will see the webpage you created BASED ON the text you had written in the HTML file. This is done by utilizing "tags" in your HTML document. For example, if you want to write a paragraph in your HTML document, you will use the paragraph "tag". This is what it will look like:

As you can see, there is a < p > and a < /p > surrounding the sentences. (Note that when you write these, write them WITHOUT the spaces in < p > and < /p >). When we view our HTML file in a browser, the < p > and < /p > will NOT be visible. Those "tags" are only visible in the HTML document, and they tell the text what to do. Without the paragraph tags, our text would simply run-on without any space between the paragraphs. For example, if you wanted to write two paragraphs, this is how you would do it:

As you can see, there are now two separate < p > and < /p >. The < p > indicated the START of a paragraph, and the < /p > indicated the END of a paragraph. So, if we want two paragraphs, we will start with a new < p > tag for the new paragraph, and close the paragraph with the closing < /p > tag.
Let's start by making your first webpage.
The great thing about making an HTML webpage is that you can save any HTML page on the internet directly to your computer, and edit it to your liking on your computer. What I'm saying is that you can actually steal anyone's HTML page and tweak it to your liking. This saves a LOT of time and means you don't have to learn HTML from the ground up, which can be time consuming or frustrating for a novice.
I work best reverse-engineering things. Therefore, stealing someone else's HTML page and messing with it works best for me. I don't need to understand what each individual "tag" does. I will change random numbers, colors, and fonts, and see how that changed the webpage. Of course, the goal is to have a completely different webpage by the end of it; someone else's page simply provides groundwork that you tinker with and change completely.
Following along some basic tutorials, like on W3schools, will help speed along this process. For example, the table tag is a tag I utilize a lot to form small grids or form the center column of this page. I may rely on W3schools to inform me as to how to change the background on a table.
With the above in mind, it's time to steal someone's webpage and make it your own. There's a lot of opportunity for this unethical practice by visitng neocities.org. Keep in mind that a lot of people on Neocities use Javascript (which I DO NOT recommend using), so only search for very basic pages that don't have fancy effects.
Take note that the filepath for your media (such as images) matters. The filepath on your computer will be different than on your server, so, it's best to
Learning CSS
Now is a good time to introduce CSS (sometimes referred to as a "style sheet"). HTML forms the structure, or, "bones" of the page. CSS adds life to the page by allowing you to change colors of text, change background colors, adjust the size of text/scrollbars/anything, add background images, etc. CSS is written differently than HTML. Some people make their CSS file separate from their HTML file. However, I recommend simply putting your CSS text into your HTML file. CSS is pasted at the start of the docunemnt, then the HTML comes after.
End of introduction.
I have given you a very basic overview as to how to get started making your own webpage(s). I won't detail more about creating the actual page, as there are many, many, many resources and tutorials which discuss how to use HTML tags, how to change font color, add images, etc. My advice is to save an existing webpage, edit the HTML and CSS little by little, observe the changes it has made, and refer to W3schools for additional help. If you need basic help, you can email me and I will provide guidance or answer your question.
Step 2: Step 2. Get a server (VPS)
Now that you have created a webpage (or webpages), it is time to get a server.
What is a server?
======================
A server is simply a computer that someone else (typically an online hosting service business) owns. They have made it easy for you to manage this computer for the purpose of hosting a website. These hosting services offer a variety of different computers you can rent online. Usually, these are called a VPS, Virtual Private Server.
Where do I get a server?
========================
There are many different hosting companies to choose from. Personally, I like using a hosting service that isn't in the habit of removing servers for saying something naughty like "zipperhead" (an offensive slur towards Japanese people). While I'm not in the habit of speaking ill about the Japanese, I still want to choose a hosting service that isn't likely to remove my server for bad words.
Therefore, I use the hosting provider BuyVM.net (aka Frantech). I recommend this company. BuyVM is pretty popular and is often sold out of servers. Therefore, they recommend you use their sister company, cloudzy.com. I have two servers with BuyVM/Frantech (same company), and one with Cloudzy (sister company).
BuyVM, Frantech, and Cloudzy allow you to pay your server using the private cryptocurrency, Monero. Therefore, I don't have to reveal a bunch of information about myself simply to have a server. While they do ask for a name and address, there is no verification, so you can simply fake those fields.
I do not recommend utilizing other VPS providers without doing your research. Many are not welcoming to true freedom of speech, or they have strange TOS like:
-> Vultr. See: https://forum.cloudron.io/topic/11416/vultr-now-claiming-full-perpetual-commercial-rights-over-all-hosted-content
-> 1984.hosting Despite saying 1984 in the name, they oppose truly free speech. See: https://litigation.1984.hosting/
"In house we refer to this as the Nazi provision, because even if we are a freedom of speech host, we will not have the fruits of our labor used to spread racism, anti Semitism, instigation of violence or hatred. We have taken down multiple Nazi sites, Jihad sites, sites encouraging violence, terrorist sites and sites endorsing anti Semitism.
Therefore, I recommend looking at all three websites I listed for your VPS.
1. https://buyvm.net/kvm-dedicated-server-slices/
2. https://my.frantech.ca/cart.php
3. https://cloudzy.com
What type of server do I get?
===============================
The type of VPS (aka server) you choose depends on what you want to do with your website. For this article, I am assuming you want to host a simple, small website for you to post your writings to, similar to this website you're on right now.
If that is the case, then the type of server you select does not require a "beefy" computer. Your VPS does not require a lot of space since we're dealing with small text files and images, possibly audio files which don't take up much space. You also don't need many "cores" for your server. Cores help process the server quicker, and we don't have anything intensive that requires much processing power. More cores would be useful if you were running more intense things on your server, like lots of videos, but since this is for text, audio, and images, we only require 1 core. As for RAM, you also don't need much for this purpose.
Frantech/BuyVM will offer different servers depending on what they have available. For our purposes, I would look for server specs similar to these:
1GB RAM
1 CPU Core
10GB to 20GB Storage (or however much storage you think you need, but even 10GB is a lot for a small simple website)
Make sure you're looking at Virtual Private Servers (VPS) on the site of your choosing, as the "block storage slabs" are to add additional storage to existing servers. Search for a server similar to the specs I listed above. It doesn't have to be exact, simply pick one with lower specs, as we aren't hosting anything crazy with this server.
Does it matter where my server is located?
============
Depending on what you want to host, yes. If you wanted to host media that would be illegal in the US, then you would want to host your server in a country where that media is legal. I choose to host in the United States, as it is surprisingly one of the less restrictive countries for my purposes, as I'm not doing anything illegal, but I may have some "hot takes" that are protected under the United States constitution (for now). A lot of VPS providers say they allow free speech until it's something they don't like, or EU countries consider certain speech illegal and therefore it cannot legally be hosted on EU VPS'. So it's not really free speech. That's why you should research and decide which host is best for you, factoring in the location and the laws of that location.
Step 3: Setting Up a Server
Overview: To interact with our server, we will utilize the "comand line". The command line is a text-based method to interact with a computer. It may sound intimidating, but, telling a computer what to do with text alone is actually very easy and bare-bones. To do this, you will need a terminal to write in. If you are on Linux, open a terminal. If you are on W*ndows, you might use the "cmd" software, but I don't use Windows and don't want to provide valuable information to Windows users.
Step 1. Get your server information.
--------------------------------------
When you purchased your server, BuyVM/Frantech/Clouzy will send you an email with the information you need to log into your server. You will have the IP address of your server, the port, and password.
Step 2. SSH into the server.
--------------------------------------
"SSH" is a method we use in the command line to connect to our server. To SSH into our server, we have to write the command to do this. Here is an example as to how this will look:
ssh root@485.947.72.622
We write "ssh" first, because we are telling the computer we want to run this software which connects us to a server. Then, we enter in our server information. Note that your server information WILL be different than the example in this article. Go to your email and replace the example information with your actual server's information. To clarify, I put placeholders in the command. Write the following command with your server's IP address information:
ssh root@your-server-ip
Once the command you have written is correct, hit "enter". You may be informed that the authenticity of the host [your-server-ip-address] can't be established, followed by a key fingerprint. You'll be asked if you want to continue. Type "yes" and hit enter. This will only happen if it's the first time logging into your server. If the connection is closed after this, simply write ssh root@your-server-ip and hit enter.
Npw you will be prompted to enter in a password. This password is in the email BuyVM/Frantech/Cloudzy sent you. Paste the password into your terminal by pressing shift+insert key. Congratulations. You are now in your server.
Step 3. Update your server.
-------------------------------------
I like to update my server before I do anything else. This ensures that all packages are up to date, which means that we won't be as likely to run into issues when installing new software.
How you update your machine depends on the type of package manager you're using. Since I recommended installing Ubuntu for this sever, this is how you update on Ubuntu:
sudo apt update
If you get asked if you want to proceed Y/n, simply type y and then enter. Y stands for yes. After this, we need to upgrade the packages to the latest verion. Run:
sudo apt upgrade
Now reboot the sever so that the update is established and the machine is running properly. To reboot, type and enter this command:
sudo reboot now
Naturally, you will now be logged out of the server. Simply run the ssh command again and enter in your password. Once again, this is the ssh command:
ssh root@your-server-ip
Step 4. Create a new user with root permissions
--------------------------------------------------
There are a few things that are highly recommended when creating a new server. Obviously, security is important when managing a server. You don't want weak passwords, and similarly, you don't want weak security by leaving default options as default, as that is an easy attack surface for hackers. There are a few things you can do to harden security on your server.
First, usually "root access" is enabled. "Root", also known as the superuser, is the default account which is granted complete unrestricted access to the Linux machine (aka server). While this enables "root" to perform necesarry tasks to maintain the server, it *also* means root can do destructive things to the server. As stated, root has complete unrestricted access to the Linux machine. This is a good thing for us, as we want the ability to have complete unrestricted access to our machine. But, this isn't a good thing if a hacker were to get into our server. Because of that, we want to restrict the ability to log into the server with root access.
The first step to do this is to create a new user who is separate from root. This new user will be given special permission to perform root tasks. Therefore, we can still make important root changes to our machine, but simply under a new user rather than doing it directly under "root". This is beneficial because a potential hacker trying to log into our server would need to guess *this* new user's name, which would make it much more difficult to guess, rather than if the attacker tried "root" as the username. This is why changing defaults such as "root" is a good idea for security.
TO GET STARTED:
Create a new user by typing:
adduser ashleyjones
"ashleyjones" is just an example user. Write any name you want instead of ashleyjones, unless you want to be ashleyjones. Press enter. You will be prompted to enter in a new password for this user. Be sure to use a very secure password. If you're copying and pasting a password into the terminal, remember that you can paste with shift+insert key. (Alternatively, you can learn about the more secure alternative to passwords, which is using a SSH key. That is beyond the scope of this article, and would probably be confusing for a someone just learning how to create a website. So, if you are interested in this, read more by following this article: https://www.digitalocean.com/community/tutorials/how-to-configure-ssh-key-based-authentication-on-a-linux-server )
You'll then be asked for things like Full Name, Room Number, etc. This is not applicable to us, so simply press enter until it stops. If only all problems in life were solved that easily.
Now we need to allow our user to have root priliveges. To do this, write this command:
adduser ashleyjones sudo
Remember that "ashleyjones" should be replaced with the name you chose.
CONGRATULATION:
Now we have a new user with root privileges. Disconnect from the sever (ctrl+d) (or close the terminal) and re-log into your server with the new user information we have just made. Do this by entering in:
ssh newusername@sever-ip-address
Step 5. Disabling SSH into root
--------------------------------------------------
Navigate to /etc/ssh/
Navigation in the command line is done by entering in "cd" before the folder you want to navigate to. So, you would type:
cd /etc/ssh/
Type "ls" (without quotes) and hit enter. This will LIST all of the items inside a folder. You should see a file called "sshd_config". We need to edit this text file called sshd_config to disable root access. To edit this file, we need some sort of text editing software. I use vim on my servers. To install vim, write:
sudo apt install vim
You may be asked to enter in your new user's password. Go ahead and enter it in to complete the install. Also, "sudo" stands for "super user do", and this is us tapping into our root privilges. Writing sudo is necesarry for certain tasks, such as installing software.
Now that you have vim installed, we can edit the file. Type this into your terminal:
sudo vim sshd_config
Now we are viewing the text file. In vim, pressing the "k" key will make you go down line-by-line. (Or the arrow keys work as well). Navigate down until you see the line that says, "PermitRootLogin".
#LoginGraceTime 2m
PermitRootLogin yes
#StrictModes yes
#MaxAuthTries 6
#MaxSessions 10
Once you are on that line, press "L" (lowercase l) until you're at the end of that line. "L" in vim moves you to the right. (The arrow keys work as well). Now we need to edit the word "yes" to "no". To do this, press "i" on your keyboard. This puts you into "insert" mode, which is basically telling vim that we want to start editing/writing in the document. Now that you've pressed "i", hit backspace until you delete the word "yes". Then, simply type the word "no". After that, we want to exit writing mode, so press the "esc" key on your keyboard. Now we will save and exit. To do this, type:
:wq
The colon is necesarry, and "w" stands for write (save) and "q" stands for quit.
CONGRATULATION
You have disabled the ability to ssh into your server with root by edited the root document using vim. This means you will probably never lose your virginity.
Step 6. Change default SSH port for security
----------------------------------------------
As stated earlier, there are some default settings we must change in order to have good security measures for our server. In this step, we are going to change the default SSH port (#22) to a different number. Attackers know that the default port to SSH into a server is #22, so leaving it at #22 leaves you vulnerable to easy attempts at hacking into your server. That is why we are going to change #22 to a different number.
First, navigate using the cd command to /etc/ssh/
(You may already be in this folder. In which case, no need to type the above).
Now we need to edit a text file. We will use vim to do this, so type:
sudo vim sshd_config
You will now be inside the text file. Press "k" to navigate down until you see
# Port 22
Once you are on that line, press "L" (lowercase l) to navigate right. Once you're at the end of the line, press "i" to enter write/edit mode. Now hit backspace to erase "22". Now type in a different number. IT IS VERY IMPORTANT TO REMEMBER WHAT PORT NUMBER YOU'RE TYPING NOW. We *must* remember the new port number, as we will have to specify this number every time we log into our server. Write down "port number (number you choose" into a text document on your computer. I would recommend naming this text document something such as, "Server notes".
We are still in "insert"(write/edit) mode. We need to do one more thing. In front of the word "Port" there is a "#". We need to remove this "#". The # is a "comment" which means it is commenting OUT "Port 22", essentially saying that this line doesn't matter. Since we are making a change that we want to NOT be commented out, we MUST remove the #. To do this, press the "esc" key to enter navigate mode. Then, press "h" until your cursor is IN FRONT (not on) the #. Then, press "i" to enter insert/edit mode. Press backspace to delete the #. Now press "esc" again to exit editing mode.
Press :wq and hit enter to write/save our changes and quit.
Now we need to run two commands for the changes to take effect. First, write:
systemctl daemon-reload
Hit enter. Then, type:
systemctl restart ssh.socket
Hit enter to run the command. DO NOT DISCONNECT FROM YOUR SEVER RIGHT NOW. ITS VERY IMPORTANT THAT YOU FOLLOW THE NEXT STEP, OR ELSE YOU WILL BE LOCKED OUT OF YOUR SEVER.
Step 7. Enable & change ports with UFW (Uncomplicated Firewall)
----------------------------------------------------------------
UFC (Uncomplicated Firewall) is software that allows us to manage which ports on our server are open to send/receive information from the internet. By default, certain ports are CLOSED OFF and we need to allow them to be open. UFW will already be installed on an Ubuntu machine, so we don't have to type a command to install it.
The first port we want to open is the SSH port. Remember -- by default the SSH port WAS 22. But, we have since changed that to a number of your choosing. It's very important that we allow our new SSH port, or else we will be locked out of our server.
First, we need to start ufw. Type:
sudo ufw enable
If you get a message saying it may disrupt the ssh connection, type "y" to proceed. It will be fine. Type the following, please note you will enter the new port number you chose, add that after the word "allow".
sudo ufw allow enter-your-new-port-number-here
Now we must also allow two additional ports to be open. Port 80 allows http, so type:
sudo ufw allow 80
We also need to allow https, which is port 443. Type this:
sudo ufw allow 443
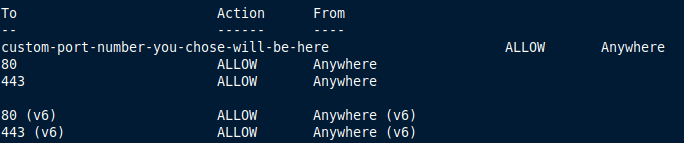
Now you're set. You can double check what your UFW settings are by viewing the firewall status. Type:
sudo ufw status
Here is what my ufw status looks like:
Now we will test logging into our server. Do not close your current terminal. Open another terminal and ssh into your server. Since we changed our default port to a new custom port, we have to specify in our SSH command which port we're trying to enter. Your command will look like this:
ssh -p customportnumberhere ashleyjones@yourserveriphere
-p stands for "port", and you follow that with your custom port number. Then, you enter in your custom username (replace ashleyjones with your username) and lastly, your server's IP address. Once you hit enter, you should be prompted for your user's password. Remember -- this is the password you gave the new user when you created it, NOT the original root password that your server provider gave you. If you were prompted for your password, congratulations, you did everything correctly. Proceed with Step 8.
If you got an error that your connection is denied, you have done something incorrectly. Do not log out of your terminal session. It's important you stay logged in to find the issue. If you log out, you won't be able to log back in, since your port number is not configured correctly. Find the issue starting by reviewing Step 6 and 7, then test again with your other terminal. If you DO log out, or, your session ended for some reason, you will have to go onto your server provider's website and completely wipe your server to start brand new. You'll have to refollow all of these steps. I have accidentally locked myself out of new servers many times. Refollowing these steps won't take too long, so don't be intimidated. Just be careful and follow each step carefully to ensure you don't lock yourself out.
Step 8. Register your domain (aka .com/url)
We have officially made our server and made it secure against the most common attacks. We need to do a bit more work on our server, but, before we can proceed with that, we need our domain first. A domain is the website URL, for example, icum.to is a domain, just as example.com is also a domain. Also, take note that there is more terminology we need to briefly learn. The ".com", ".org", ".edu" you see are called TLDs. That stands for "top level domains", and the nitty-gritty doesn't matter here. All you need to know is that a TLD is the ending of a domain that starts with a "dot". There are many fun TLDs to choose from these days, but, the type of TLD you choose DOES matter depending on what you're doing on your website.
A "domain registar" is a business that helps you purchase your domain. Popular (but not recommended) registars include GoDaddy and Namecheap. Your domain registrar can deny you further use of a domain. Who you register your domain with matters, just as who you host with matters. Going with a registrar such as GoDaddy is not a smart idea if you plan on writing certain bad words or thoughts on your website. While there are many fun TLDs like ".gay", it is important to know that certain entities actually own and control these TLDs. The entity that owns the .gay TLD will refuse connections to any .gay website if they catch wind that you are using the .gay TLD to host a website that is "hateful". Certain popular TLDs like ".com" will also reject connections to websites that do not follow their rules, and a lot of the time, these rules are dependent on where the TLD is registered.
Overall, I'm going to assume you're not doing anything illegal like hosting pirated movies, and therefore, you simply want a domain that is good enough to support free speech and keep it at that. Therefore, the best domain registrar I recommend is njal.la Not only does njal.la not require your personal information (unlike other domain registars), but, they also allow you to pay with Monero, a private crypto currency.I would recommend using the TLDs ".to" (tonga) or ".su" (soviet union), as they have the best (but probably not perfect) rate of letting people do what they want with a domain. In reality, you're *probably* fine using most TLDs if you're not doing anything illegal and if your website isn't too crazy.
You can look at the fun TLDs available on njal.la and proceed with your purchase of your domain.
Step 9. Configuring your DNS records
Now that we have a domain, we need to tell the domain WHERE it needs to point to. This is easy, simply go to manage your DNS records. We will add two records:
1. Add an "a" record. Type your full website name for the "name" (with the .com or whichever TLD you chose). Put in the IP address of your server under the IPv4 Address. Then save these changes. Now it knows to point to your server.
2. We will also add a www. version of your website. Add an "a" record. Under "name", type www.your full website name.com (or whichever TLD you chose). Put in the IP address of your server under the IPv4 Address. Then save these changes. Now it knows to point to your server.
Step 10. Configuring NGINX on your server
NGINX is software that serves your files up to the internet. It is a web server, not to be confused with your server. Your server is simply a computer, whereas NGINX serves files to the web, thus, a "web server".
It is a good idea to install NGINX, as it has a few functionalities (such as reverse proxying, caching, etc.) that come in handy with a server. For our usecase, we are going to utilize NGINX for serving our files to the web.
Before we proceed with installing NGINX, let's make sure we're in our home directory in our server, just to make things less convoluted. To navigate to our home directory, type:
cd ~/
Then hit enter. The tildee ~ will always represent the home directory, and the slash is the end of the directory. Now let's proceed with installing NGINX.
First, we are going to install NGINX on our server. Type this:
sudo apt install nginx
We will start NGINX now. Type this command:
sudo systemctl start nginx
We will also enable NGINX to start on boot. Type this command:
sudo systemctl enable nginx
Now that NGINX is installed and started, we need to configure it. We need to edit the configuraton file. This is located in the directory /etc/nginx/nginx.conf So, navigate to that directory using the cd command. (Example: cd /etc/nginx/ and then hit enter). Then, once you're in the /nginx/ directory, edit the configuration file by typing:
sudo vim nginx.conf
Using vim, we will edit this file. Remember that in vim, j moves you up, k moves you down, h moves you left, l moves you right. Instead, you can also simply use the arrow keys to navigate. i puts you into "insert" (aka edit/write) mode, esc takes you out of insert mode. Shift+insert key will paste something from your computer to the vim document. Writing :w will "write" (aka save) your file, and :q will quit. You can also just type :wq to write and quit. Refer to this section when editing your NGINX config file in vim.
Now we will edit the config file. Navigate *underneath* the section that states:
http {
and stay ABOVE the part that says:
##
# Basic Settings
##
Once in between these section, follow this next step. Copy the text below. Then, press shift+insert key to paste it into the document.
server {
listen 80;
server_name localhost;
location / {
root /var/www/;
index index.html;
}
}
To clarify, now your document should look like:
http {
server {
listen 80;
server_name localhost;
location / {
root /var/www/;
index index.html;
}
}
##
# Basic Settings
##
There may be more underneath this, just leave it. Before we move on, I want to explain what we just did. "Listen" refers to the port on our server we want to serve. By changing listen to port 80, we are allowing http traffic, which is good. Also, location dictates which folder NGINX will serve files from, live to the internet. Remember, this is /var/www/
Now that we have edited the configuration file, we need to save it. Make sure you're out of insert mode by pressing the esc key. Then, type and enter :wq
Now we will restart NGINX so that these changes are updated on the server. Type:
sudo systemctl restart nginx
You can test if NGINX is running correctly by visiting your website. Go to http://insert-your-server-ip-address-here or simply go to your domain if you have configured it already.
Step 11. Setting Up Website Directory
Files you put in a certain directory (aka folder) on your server will be served live to the internet. For this, we are going to create a directory (aka folder) for our domain.
We will start by following the filepath /var/www/ as this is the filepath we need to follow to create our actual website directory, which will be live.
I will use "yourwebsite.com" as an example -- replace the example with your domain name. "mkdir" stands for make directory. Type this:
sudo mkdir -p /var/www/yourwebsite.com
Now we need to allow our user permission to edit this directory by enabling ownership of this directory. Type:
sudo chown -R $USER:$USER /var/www/yourwebsite.com
At this point, we will create a test page. Type this, making sure to place your domain where "yourwebsite" is:
sudo vim /var/www/yourwebsite.com/index.html
We will add basic html inside your html "index.html" document. Copy and paste (using shift+inser key) inside your document.

When you are done, press the esc key, then type and enter :wq
Step 12. Setting Up Sever Blocks
In the event that your server will host multiple domains, you should set up server blocks. Even if you plan to only host one site, I would highly recommend this step, simply to future-proof any trouble you'd go through in the future if you added on another domain to your server.
Type and enter this, making sure to replace "yourwebsite" with your website name:
sudo vim /etc/nginx/sites-available/yourwebsite
We are now editing the config for this block. Paste this (hint: shift + insert key to paste in vim), making sure to change "your_domain" sections to your actual domain:
server {
listen 80;
listen [::]:80;
root /var/www/your_domain;
index index.html index.htm index.nginx-debian.html;
server_name your_domain www.your_domain;
location / {
try_files $uri $uri/ =404;
}
}
Save this file by writing :wq (note: make sure you're not in insert mode by pressing esc and then writing :wq)
After this, we will create a "symbolic link" from this config file to another file on our server that will reference this file. A symbolic link is similar to making a shortcut on your desktop. You're not actually copying another file, rather, this file is being referenced. So if you alter the original file, the linked file will follow the update you made, since it's linked. Write this to make the symbolic link from our config file to our sites-enabled directory:
sudo ln -s /etc/nginx/sites-available/your_domain /etc/nginx/sites-enabled/
Press enter after you write that command. After all of this, it's time to make sure NGINX works. Type the following to see if there are any errors:
sudo nginx -t
If there are no errors, we can proceed by restarting NGINX to complete the changes made. Type:
sudo systemctl restart nginx
All done here.
Step 13. Getting an SSL certificate
Now we must get an SSL certificate. Without this, data sent and received from our server will not be encrypted. SSL is very standard and expected to be installed on servers. Without one, users visiting your website will get a big warning that "an attacker may be trying to get your information". This is a drastic stretch, but it's to baby-proof the internet for retards. All this warning means is that typically, and SSL certificate is not issued to this server. Let's get an SSL certificate.
To start fresh, let's make sure we're in our home directory. Type:
cd ~/
Then press enter. Remember, cd means "change directory" and ~ is always our home directory, with / representing the end of the directory.
First we must install certbot, which will issue the SSL certificate to us. We can obtain a free SSL certificate from Let's Encrypt. Type:
sudo apt install certbot python3-certbot-nginx
Since we are getting an SSL certificate, we now want to allow HTTPS traffic. The port to allow https traffic is 443. Let's double check our UFW settings to ensure that everything looks correct. Type:
sudo ufw status
This is what should be returned:
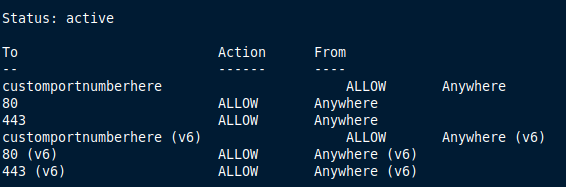
If you don't see port 443, add it with:
sudo ufw allow 443
It's time to generate the certificate for our domain. We will run a command to do this. This command involved nginx, which will ensure that nginx automaically reconfigures settings in the config. Below you will see the "-d" flag, which indicates the domain(s) we want this certificate for. Type the following:
sudo certbot --nginx -d yourwebsite.com -d www.yourwebsite.com
Now you may be prompted with a few things. First, you may be asked for an email address from Let's Encrypt as well as agree to the TOS of Let's Encrypt. You will also be asked if you would like to redirect HTTP traffic to HTTPS. It's very important that WE DO redirect HTTP traffic to HTTPS traffic, so select the option where you allow this.
Congratulations. Your website now has an SSL certificate and people visiting your website will not be harassed with a warning screen suggesting the website is "unsafe". Keep in mind that SSL certificates expire every 3 months, but, we can configure certbot to automatically renew an SSL certificate for our domain(s). Run this command to enable auto-renew:
sudo certbot renew --dry-run
Now if you visit your website, you will have a lock icon next to the URL, indicating that your website has an SSL certificate. That's all for this section.
Step 14. Make a dedicated "uploads" folder on your server
This is not required, but it helps keep things organized and this article relies on the use of a directory called /uploaded/ in the next step, so I recommend you create one. Everything you upload will go to this folder.
Make sure you're in your server. Then, navigate to your home folder by typing: cd ~/ then hit enter.
Type this command:
mkdir uploads
"Mkdir" means "make directory". You've just made the /uploads/ folder and can move on to the next step.
Step 15. Uploading files to your server
Everything is set up and ready. We can now upload files to our server and they will be served up live to the internet. Files such as images, videos, and most importantly, your html documents are some of the things we will upload. Once these are uploaded, you will be able to view your website live on the internet as intended.
There are two ways to upload files: in the command line, or, via SFTP.
Personally, I upload using the command line, as I prefer the command line interface (CLI) over graphical interfaces (GUI). If you want something quick and easy, then uploading via SFTP is a good route to go.
METHOD 1: SFTP
--------------
SFTP still utilizes the SSH method to access your server. This is a quick-and-easy way to upload your files. Simply install an SFTP client (like Filezilla). Once installed, you will simply enter in your server information (such as server user name, password, SSH port you chose). After that, you can select which files on your computer you want to upload to your server.
ownership change
METHOD 2: Command line with rsync (the method I use)
-----------------------------------------------------
I prefer this method, as it requires less moving parts and thus, less attack surface. Plus, I prefer making adjustments to a command rather than messing with GUI settings, which actually tend not to be as straightforward. While SFTP with Filezilla is easier, sometimes it's good to push yourself to learn the barebones way to do things, as you have more of an understanding as to how things are actually working behind the scenes.
To upload to our server, we will upload from our computer. Becuase of this, we don't need to be in our server. Rather, we have a terminal open on our local machine and write a command which tells our machine to SSH into our server and send certain files from our local computer over to the server.
With that in mind, we will need to open a terminal on our local computer. You can open this terminal in the directory/folder where the items you want to upload are. Alternatively, you can open a terminal and manually navigate to that folder with the use of the cd command.
Now that you're in the folder with the items you want to upload, you will type the rsync upload command. I will show the command, but it's important to read the explination behind this command. Here it is:
rsync -vzr -e 'ssh -p enter-port-number-here' --partial --append --progress FILENAMEGOESHERE your-username-here@ip-address-goes-here:/home/your-username-here/uploaded/
I will explain the command, and you can alter it to your needs. First, we type "rsync" which tells the server that we want to utilize the rysnc software to upload to our server.
rsync -vzr -e 'ssh -p enter-port-number-here' --partial --append --progress FILENAMEGOESHERE your-username-here@ip-address-goes-here:/home/your-username-here/uploaded/
Then, the flags -vzr. V stands for "verbose", which will write out what our server is doing when we upload our files. I like adding this, as I can visually see if my files uploaded. Without the "-v", we wouldn't be able to visually see our files being uploaded in realtime. Following the -v flag is a "z". The z flag compresses files before being sent to the server, which is beneficial if you have slow internet. Lastly, the "r" flag means recursive, which will upload any directories and the contents inside of them. If you try to upload a directory without the -r flag, it will not work.
rsync -vzr -e 'ssh -p enter-port-number-here' --partial --append --progress FILENAMEGOESHERE your-username-here@ip-address-goes-here:/home/your-username-here/uploaded/
Following the flags is the call to ssh into our server. This is where we enter in our server information in order to succesfully ssh into the server. Thus, ssh is called for in the command. Following "ssh" is a -p flag, which stands for "port". Since we changed the default port (22) for security purposes, you must specify the new port number you chose after the -p flag.
rsync -vzr -e 'ssh -p enter-port-number-here' --partial --append --progress FILENAMEGOESHERE your-username-here@ip-address-goes-here:/home/your-username-here/uploaded/
--partial --append --progress will pick up the file transfer where it left off in the event that your connection drops.
rsync -vzr -e 'ssh -p enter-port-number-here' --partial --append --progress FILENAMEGOESHERE your-username-here@ip-address-goes-here:/home/your-username-here/uploaded/
FILENAMEGOESHERE is to be edited by you. You will enter in the filename you want to upload. Alternatively, if you're inside a directory and want to upload EVERYTHING inside the directory you're in, you can just type * where "FILENAMEGOESHERE" is, and that will upload everything inside the directory.
rsync -vzr -e 'ssh -p enter-port-number-here' --partial --append --progress FILENAMEGOESHERE your-username-here@ip-address-goes-here:/home/your-username-here/uploaded/
Now we specify WHERE on our server we want these files to be uploaded to. I do not like to upload my files directly into the folder where it is served up live to the internet right away. Therefore, I choose to upload my files to a directory on the server where it is private. I do this in the home/yourusername/ directory.
username-goes-here@ip-address-goes-here:/home/your-username-here/uploaded/
Here is the command in full:
rsync -vzr -e 'ssh -p enter-port-number-here' --partial --append --progress FILENAMEGOESHERE your-username-here@ip-address-goes-here:/home/your-username-here/uploaded/
Remember to alter the port number to your ssh port number, edit FILENAMEGOESHERE to your file or * for all files, as well as edit the username areas and IP address to your server's IP address.
Step 16. Move the uploaded items to a public directory
We just moved files to our server from our computer. However, we are not actually in our server (unless you have a terminal already open where you are connected to your server), since we only briefly connected to it to send files. Therefore, we need to connect to our server to manage the files on it. We will connect with the SSH command mentioned at the earlier part of this article. Type the following into your terminal, making sure to adjust the input to match your server's information:
ssh your-username-here@your-server-ip-address-here -p your-custom-port-number-here
We're in our server. As stated in the previous step, I like to upload my items to a folder that is NOT public. This allows me to be less selective about the things I'm uploading. When I'm sure my files all look good, then I can move them over to a public folder. We created this "public folder" in step 10 of this article. Anything inside the directory /var/www/yourwebsite.com WILL be public.
Since I want the files I uploaded in my /home/username/uploads directory to be live, I will copy the contents inside that directory over to the /var/www/yourwebsite.com directory. This will be done by using the "cp" command, which stands for "copy". I like to COPY the files rather than use the MOVE (mv) command, because I personally want the files to also still remain in my uploads folder.
First, let's navigate into our uploads folder. Type:
cd /uploads/ and hit enter.
To copy the files from your private /uploads/ directory to your live /yourwebsite.com/ directory, the command will look something like this:
sudo cp -r fileyouwanttoupload.html /var/www/yourwebsite.com/
However, there will be adjustments to this command based on what files you want to move to your live directory. If you want EVERYTHING from your /uploads/ folder to be live on the internet, then you can use an asterisk * to indicate that you want to move everything. The command would look like this:
sudo cp -r * /var/www/yourwebsite.com/
If you want to move a folder, it would look like this:
sudo cp -r /myfolder/ /var/www/yourwebsite.com/
You can also indicate copying over multiple folders in one command, like this:
sudo cp -r /myfolder/ /anotherfolder/ /var/www/yourwebsite.com/
You can copy over folders and other media in one command like this:
sudo cp -r /myfolder/ image.gif turtles.jpg audiofile.mp3 /var/www/yourwebsite.com/
How you move over the files can be done in various different ways. This is simply a matter of learning how to write basic commands in the command line -- this is just an overview to help get you started. If you have a lot of files you want to copy over, using the * (everything) command is helpful. Also, the -r is required in your command if you are moving folders. If you are not moving any folders, then you don't have to type -r.
Congratulations. You have moved files to your live folder on your server, meaning your website should fully be live on the internet for viewing. Go to your domain to view it.
Step 17. Other tips for managing your server
TIP 1: REMOVING FILES
----------------------
You may want to remove files in your /uploads/ folder (or any folder on your server) to clean things up. You can do this by using the -rm command, which sands for REMOVE. Just as we can specify what files to copy as described above, we can do this with the "remove" command. For example, if I want to remove something from the /uploads/ folder, I can type this command (MAKING SURE I AM IN THE CORRECT INTENDED FOLDER SO I DON'T DELETE THINGS IN OTHER IMPORTANT FOLDERS:
sudo rm myimage.gif
OR
sudo -r rm /myfolder/
OR
sudo -r rm *
^ that removes everything
TIP 2: USE PREVIOUSLY TYPED COMMANDS WITHOUT TYPING THEM AGAIN
---------------------------------------------------------------
Simply press the up arrowkey and you will cycle through the most recent commands you've entered. This is handy if you want to execute a command you recently wrote, or if you need to find a command you used not too long ago.
TIP 3: SEARCH FOR PREVIOUSLY USED COMMANDS
------------------------------------------
If you know part of the command and want to find it, you can search for it. Type ctrl+r then start to write part of the command, and the command line will find the most recent version of the command using the keyword you've written. You can cycle through all of the results the command line found by pressing ctrl+r again, and again. If you find the command you want to use, press the right arrow key. It will drop that command into your command line, and you can edit it or simply press enter.
TIP 4: HOW TO EDIT DOCUMENTS DIRECTLY ON THE SERVER
----------------------------------------------------
If you want to make a small update, found an error, etc., you do not need to reupload a document. Instead, you can edit the document directly on the server. We have already done this a few times in this article. You will first need to find the file, then edit it with the text editor, vim. Here is what that command will look like:
sudo vim /var/www/yourwebsite.com/pooppage/index.html
vim states that we are going to open a file with the text editor, vim, and the following is a directory path which dictates where the file is that we want to edit. of course, you will need to modify this directory path to fit the path of your files/documents. I have detailed how to use vim in this article, but to refresh your memory:
press "w" to enter "write" (aka insert/edit) mode.
press "esc" to exit insert mode,
h moves you left, j moves oyu up, k moves you down, l moves you right (arrow keys also work)
shift+insert to paste
ctrl+v then h(left) j(up) k(down) l(right) (or simply use arrow keys) to select a big batch of text at once
y will "yank" *aka copy)
p will paste what you have copied in this SSH connection. If you want to paste something you copied on your local machine, you will have to press shift+insert on your keyboard
TIP 5: HOW TO BACK UP YOUR SERVER
----------------------------------
TIP 6: HOW TO UPDATE YOUR SERVER
----------------------------------
TIP 7: HOW TO CANCEL A COMMAND OR PROCESS
-----------------------------------------
To quit a command you're in the process of writing (or to stop a command that's being ran) press ctrl+c and this will cancel a command.
TIP 8: HOW TO AUTOCOMPLETE
---------------------------
Conclusion
----------------------------------------------
That is how to create your own website the way I created mine. As I said at the start of this article, I understand that this was the "hard" way to create a website. However, in my time with messing with servers, linux, or anything digital, I have learned that understanding the underlying infrastructure is massively important. It puts many tools in your toolbelt that you can utilize in the future. Whereas if you had done things the "easy" way, you may have a website, but you may never know how to troubleshoot it like an expert. (While I am not an expert, I certainly know more than someone who made a Squarespace website). In creating a website alone, you have also become a system administrator capable of using the command line, this is an achievement you should feel great about. These are skills that can lead you to many more intersting hobbies. Think of this as a gateway drug, except you overdose on fun with more opportunities to learn other digital skills.
If you have trouble while following this article, you can email me. ashleyjones@icum.to I will assist as much as I can, but I ask that you describe the issue as best as you can. This will better equipt me to be able to help you.
| 
 News
News
 Who am I?
 My Monthly Column